
Christmas is nearly upon us so my decoration making has started in earnest. I always like to have a few new homemade cuties to add to my tree this year and for 2017 it’s going to be a couple of … Continue reading
Christmas is nearly upon us so my decoration making has started in earnest. I always like to have a few new homemade cuties to add to my tree this year and for 2017 it’s going to be a couple of … Continue reading
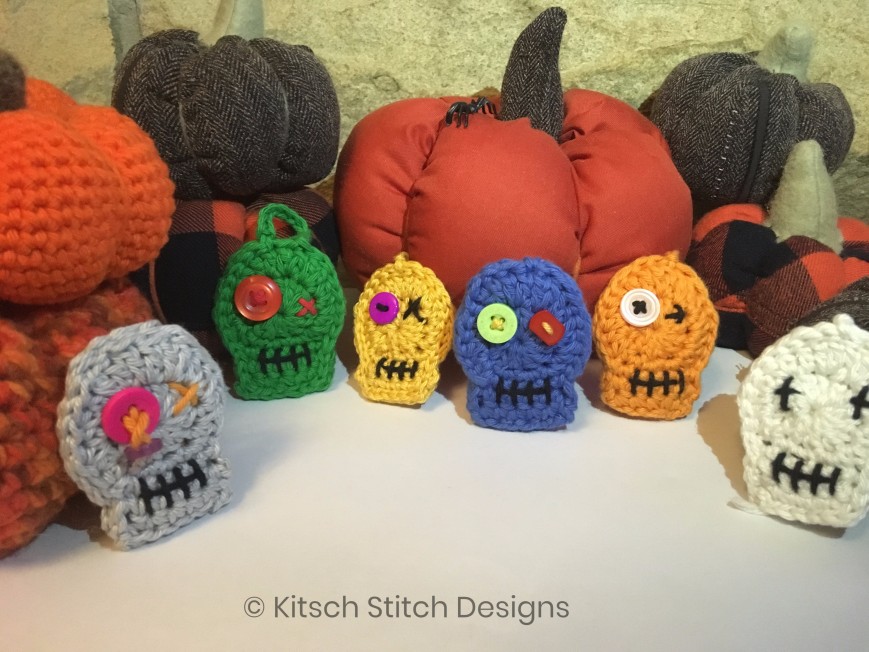
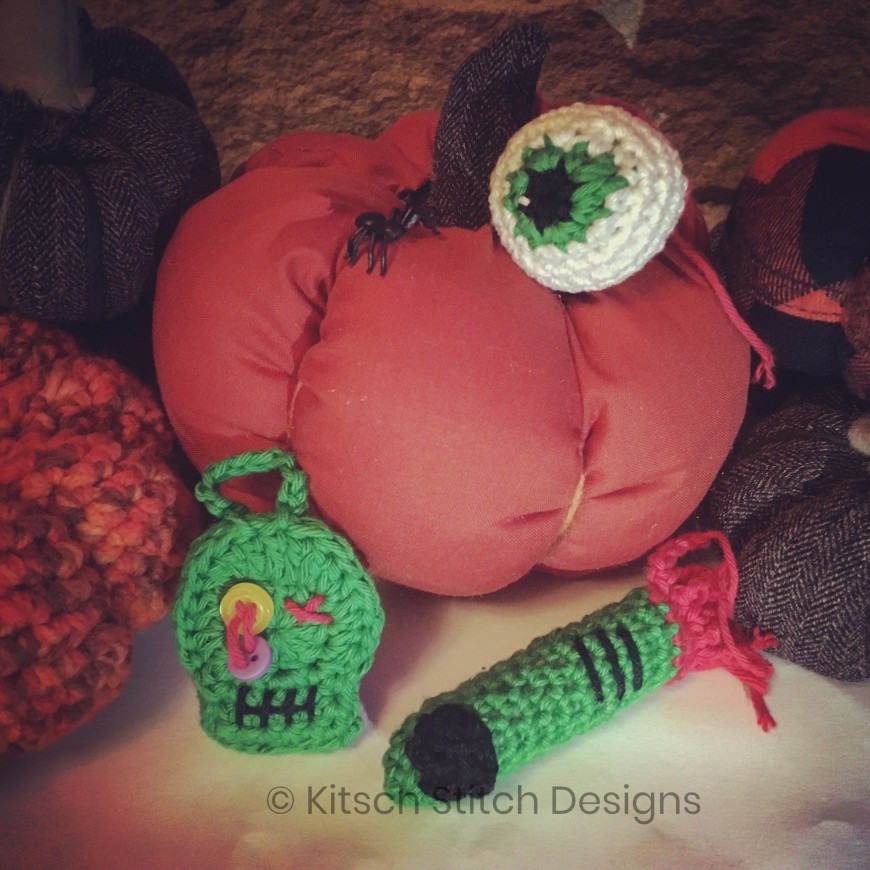
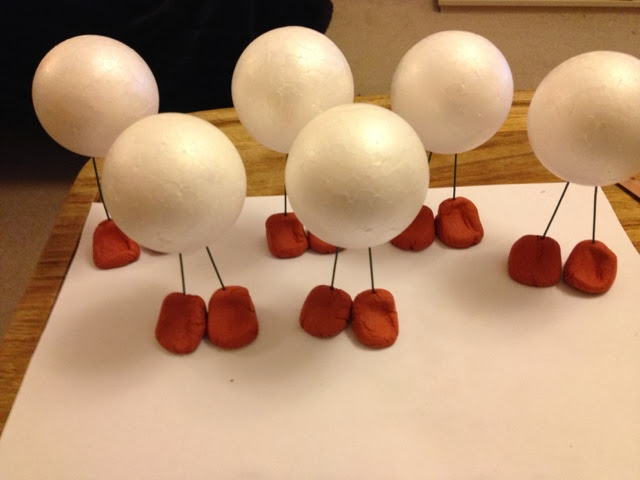
Halloween 2017 is fast approaching and as per usual, I’m busy making new decorations to decorate our Halloween tree.
This year it’s been pumpkins (both crocheted and fabric), eyeballs, severed fingers and these delightful little zombie skulls.
The best thing about these skulls is how super simple they are to make and how little time they take. Minus taking in the ends, I could make a blank skull in less than 5 minutes.
So here’s how to do it…

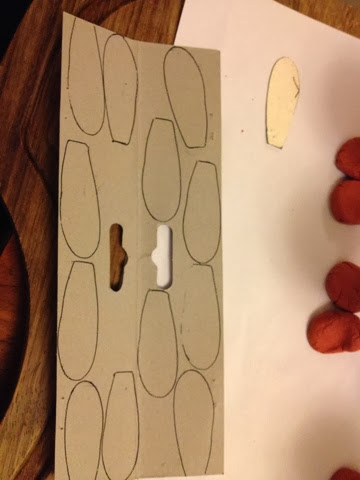
Instead of designing a pattern myself this time I found a super one by Heather Jarmusz on Ravelry so I used that to make the blanks. You can find them here:
Ravelry – https://www.ravelry.com/patterns/library/spooktacular-sugar-skull-applique
Facebook – https://www.facebook.com/hamandeggscrochet
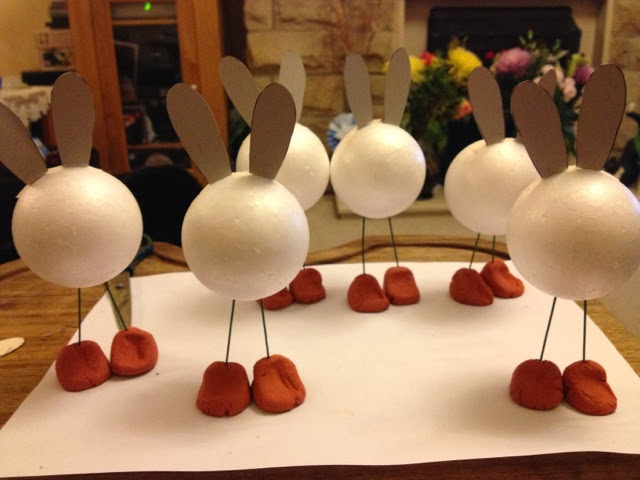
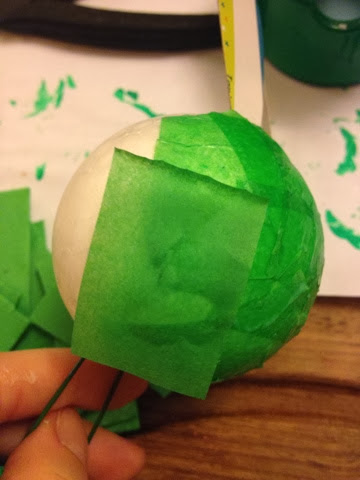
As I wanted to make a hanging decoration that looked good on both sides I made two of every colour with a view to crocheting them together.

Then I set about decorating them with a mouth and button eyes.
The decorating
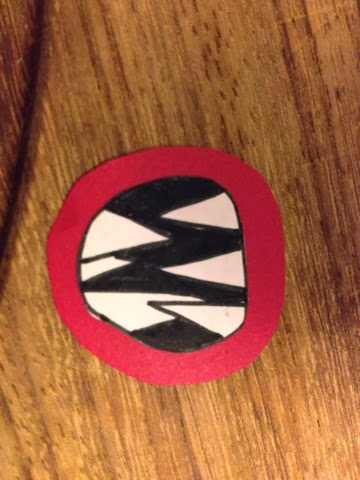
Using black double knit cotton or embroidery floss, do a straight line across between round 2 and row 1. Then, do a series of straight lines down, crossing the line as above in the finished skull. I am going to try out one with fangs and blood so if it works, I’ll post that as an alternative to this traditional skull mouth.


The eyes are next and this is where you get to have fun and decide what type you want to do. Two of my nieces and nephews were with me when I was decorating these so I let them loose with the designs and did what they asked.
To do the hanging eyeball take two buttons, one slightly smaller than the other. Thread them both onto some double knit cotton.

When you’ve done, pull the cotton through the font of the skull, making sure you keep the loose thread between the two buttons. Normally, at this point I’d be encouraging you to keep the back of your work as neat as possible. Thankfully, as you won’t be able to see the back you don’t have to worry here. I’d place a knot at the back to secure the larger button and make sure there is still loose thread between the two. Once it’s secure, pass the needle back through the empty two holes in the button to ensure it’s not going anywhere. At this point, I’d like to caveat that these are decorative items and not suitable for young children due to the buttons.


For the second eye you could the same the again, do a cross or add just one button.


Now go ahead and do the second one. You could do it to match the front or have both sides different.

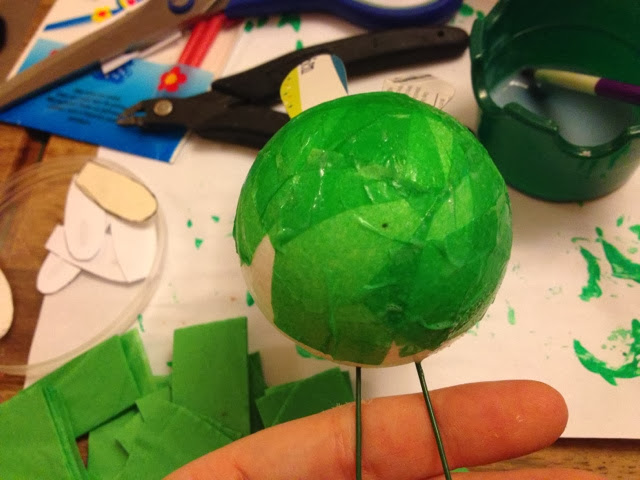
When you’ve got both sides done it’s time to crochet them together. Hold them, wrong sides together and put your hook through the 1 ch at the end of the last row.
Do 1 chain then slip stitch in every stitch around making sure you go through both the front and the back skulls.


When finished, take in the ends and add a loop to the top for hanging.


And you’re done!
I’d love to see any that you’ve made.

Halloween again! Or at least it was a couple of weeks ago and yet again, we had loads of activities planned. There was a party at a softplay, a horror walk, pumpkin carving, a Halloween breakfast, Halloween movies and of course, trick or treating.
I know that in the US any costume goes but for me, Halloween should be scary. After all, it’s when ghouls and goblins walk the earth so we’re supposed to dress as scary as possible to blend in! Luckily, my big two share my feelings on the matter so Roux and Hurricane want blood and gore when it comes to their costumes.
Last year, I went on a zombie walk so attempted some zombie face paint (which I was really chuffed with at the time) and Monster came along for the ride. It was a great baby wearing costume but this year, I didn’t need one.


I asked Roux and Hurricane what they wanted to do this year and they decided we’d be a family of zombies. Obviously my love of all things zombie has come shining through! I was really pleased as I’d seen an amazing tutorial on YouTube by Bonnie Corban and desperately wanted to try it out.
As Halloween fell on a Saturday a very good friend and drinking partner had agreed that we’d go out around the local pubs and clubs in fancy dress. It was brilliant! I was ever so chuffed with how my costume turned out although I kept getting grabbed for photos. I do wonder how many people woke up on Sunday morning to find a picture of my face on their ‘phone.
Starting with the children, they wanted lots of blood so I got 3 plain white t shirts (2 for £2.50 in Asda) and tore them up then covered them in blood. The blood was very red so looked a bit too fresh. A quick google told me that if you mix the shop bought blood with gravy it’ll darken it up nicely. Unfortunately, none of the google searches said that you would reek of roast beef! It was quite something, we absolutely STANK.

I bought myself a dress from a charity shop for the grand total of £1! Then I ripped the top, shredded the hem at the bottom and covered it in gravy smelling fake blood. The smell really was horrific, it permeated the house so next time, I’ll use black food colouring m’kay.

For the soft play party they both wanted lots of blood. It stains. Thankfully they were dressing up again the next day so face paint covered it all. Unfortunately, Monster wasn’t keen on being a zombie at all, I couldn’t help but laugh when he saw himself in the mirror and cried (bad mother). He was massively over tired and quite hungry when I attempted to do this so perhaps that wasn’t the best but never mind – at least I hadn’t spent a fortune on his costume. A quick change of clothes and a swoosh with a baby wipe and he was happy again.


The next day, we were doing the horror experience and some trick or treating so we went same costume but different face paint.


They were really getting into the swing of it and constantly walked like zombies whilst trying to bite their cousins.
Now to me… following the tutorial upthread and wearing the dress I first put on some latex and tissue…

Then I matted my hair with copious amounts of dry shampoo, texture powder and a lot of back combing, finished my face paint…

Added some white zombie contacts…

And then started to bite everyone…
This week I learnt an important life lesson about ASSUMPTIONS and hopefully if you hear my woeful tale you’ll be saved from the same curse of the Assumption.
Let’s start at the very beginning, it’s a very good place to start…
A few weeks ago Hurricane’s (reception age) teacher took me to one side and gave me the good news that she’s been picked to take the lead in the Christmas Play. I was handed her lines and ASSUMED that also meant I had to provide a costume. ASSUMED.
Miss wasn’t pleased as the main part was a figure called The Sleepy Shepherd. She didn’t want to be a shepherd, she wanted to be an angel. Little madam. I laughed about this in school and said I’d make her something bright and the teacher didn’t flinch.
Costume made and I took it in this week. School were over the moon and then dropped the bombshell – they are providing all the costumes! Gah! Apparently though they’re all very tatty and just cobbled together as none of the staff sew. Due to this, she’s going to find me this time next year and ask me to make/remodel them! I’m practicing saying “no” now. Do you think it’ll work?
Anyway, here she is. I’m writing up a ‘how to guide’ so I’ll put that up when I get a second.


Gosh, it’s taken me a long time to get around to doing this post, I’m very much a victim of Life, it gets in the way. On the 14th November it was Children In Need day and as such, school children around the country attended their lessons in a variety of costumes from pyjamas to fancy dress.
Our school decided to dress as a Superhero so for the boys this opened up opportunities to attend as all manner of their favourite comic book heroes, for girls however, I just knew the classes would be full of Princesses. I’ve got nothing against Princesses at all but I do get a bee in my bonnet over them NOT being superheroes in just the same way I dislike boys going in on World Book Day as Spiderman.
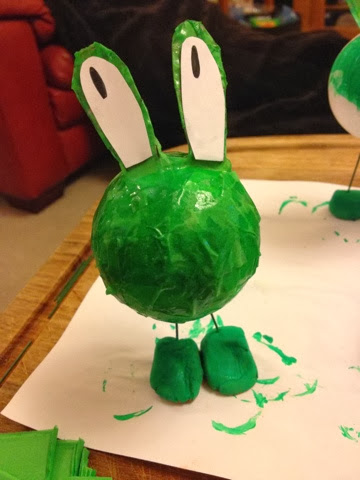
Anyhow, Roux has quite a few superhero costumes to choose from in his wardrobe so I thought I’d start with the easiest, he could wear one of his – Ben10, Spiderman, Superman, Batman and the SuperRoux outfit that I made him last year. Did he want any of these? No, that would be too easy. He wanted to be The Green Lantern. *Sigh* That’s me making a Green Lantern Costume too but how! How would I do that? I had a quick google search and all the ones I found were skin-tight and full of padding, my skills aren’t up to that and he didn’t have any green clothing whatsoever that I could mangle into a costume. Bummer.
His Godfather is superhero daft and loves all things DC/Marvel so I asked for his help, what Green Lantern image did he think of when the name sprang to mind?

Well this gave me an epiphany! See that green bit? Well wouldn’t it work as a bib? Felt on a roll turned into a tabard with the logo on the front, some long gloves, black clothes underneath and some boot covers and I’d be done.
Using felt on the roll, I cut out the tabard and put elastic on the sides to hold it together. I also used the same felt to make boot covers that slipped onto the leg using elastic. The symbol on the front is made from felt and glued on using PVA. Next up was the gloves, they’re knitted white gloves (2 pairs for £1) with white felt sewn on. The lamp is made from green metallic card with a battery operated tea light and the ring is made from loom bands with a bead in the centre and I painted his face. He adored it which is all that counts.
![IMG_2877[1]](https://kitschstitchdesigns.files.wordpress.com/2014/11/img_28771.png)


Then it came to Hurricane, as I said up there I wanted to do everything in my power to stop her going as a Princess. We love Princesses here in this house and for about 6 months, she refused to be called anything other than Princess but they have their place and that place isn’t as a superhero. She accepted the news that she couldn’t go as Elsa pretty quickly so I ran through a few options with her (Batwoman, SuperGirl, She Ra etc) or perhaps a real life one like a doctor, firewoman, (me ha!) she declared very vehemently that she wanted to be Poison Ivy. Ok, that’s a super villain but who cares, it’s better than Belle.
On doing a few GIS they’re all very, umm, sexy costumes and totally unsuitable for a 4 year old! There was no way that I could allow that much flesh on show so I needed to get my thinking cap on. In the end I settled for a pair of her green school tights, a black leotard, some green netting to make a half skirt with lots and lots (98 at last count) green leaves hand stitched on with a red wig we already had thrown in for good measure. I found the net green gloves and thought they’d be perfect and also made her some loom band bracelets as she wanted a super power so I convinced her that she could shoot branches out of her bracelets that wrapped people up.
I’m pretty self depreciating normally but even I’m happy to say that this is pretty damn good. I love it and so does she.


This week in Britain we’re commemorating Remembrance Day which means that the country have all been sporting those little paper poppies since the middle of November. My Father was in the army and for a decade, I was a forces … Continue reading

Well this weekend has been an absolute blast and allowed me to indulge in a bit of an obsession of mine…Zombies! Long have I wanted to do one of the experiences where you’re chased by zombies but I’ve never had the opportunity so when a very good friend of mine told me about a local Zombie Walk I jumped at the chance.
The idea is a basic one, you dress as a zombie then join a group of other zombie fans and shuffle through the town centre of a few hours scaring all the locals whilst shaking a few buckets for charity. Sounds easy? Well I’ll admit, the slow, limping drag of the undead is actually quite hard to keep up for that length of time but it’s fun!
Roux and Hurricane were at their Dads this weekend so sadly couldn’t join me (now they’ve seen the pictures, they’re quite gutted – next year children!) so it was left to the Monster and I to do our bit. I’d seen a picture on Pinterest ages ago of a woman wearing a baby facing out under a t shirt and I’d been desperate to give it a go so I was killing two zombies birds with one stone so to speak.
The actual costume part was super simple – a very large t shirt (I got xxl and it was only £2.99) and some fake blood from the pound shop. Obviously you also need a baby carrier, in this instance I used my Melkaj Mai Tai, a baby helps and I also bought a couple of fake limbs that Monster was supposed to play with while we were wandering around.
I cut small notches in the t shirt where the head and arms needed to go, once I’d done that I tore the holes larger so it looked like he’d burst out a bit more. Then I was quite liberal with the fake blood and gave the openings and the front of the t shirt a good dousing with the stuff. I’ll warn you, it took days to dry and in the end I took a hair dryer to it. Despite that, it still rubbed off on anything it touched and as of yet, I’ve not yet got it out of the top Monster wore underneath. It also stained my fingers pretty badly as you can see here, it took 4 days or so for that to wear off.

The make up was a littler harder but no where near as difficult as I’d envisaged. It probably helps that as I do only get 4 hours sleep a night I do a good impression of a zombie most mornings but in reality, I followed a very good tutorial by Natalia Issa and it pretty much used items I already had in my make up.

This is old, cheap make up that I’d been bought approximately 10 years ago (*cough* hoarder) and had never used. It was absolutely perfect for this.
I’d had my hair cut the previous day and it was looking beautiful but I took the comb to it and backcombed it like crazy so after just 20 minutes I looked like this…

It goes to say that you know you’ve done a good job when even your own Mum doesn’t recognise you! I sent the picture to my sister as well and she had to be told it was me. I was very chuffed with the result but when I got to my friends house she had latex which I’d never played with so I slapped some on my cheek bones and turned to this.

Monster didn’t escape either, he’d fallen asleep so I didn’t get chance to change him into his dark coloured clothing but I did take advantage and did my best and gently attacking him with facepaint.

See that fake blood around his mouth? Well I’d put that on top of white face paint hoping it would stop it staining his skin. It didn’t. *hollow laugh*
Once I got there, I strapped him onto my front, whacked the t shirt over us both and made our way to the pub that we were meeting at.

See him there playing with the hands? Well that’s the ONLY time he deigned to play with his two fake limbs. I had images of him chewing on those limbs looking even more like a scary zombie baby than he already did but would he play ball? No. Not one bit!
Once we got there one of the fellow zombie enthusiasts let me into a secret – Black Jack sweets. Give them a good old chew then push them into your gums and they give you blackened teeth.

Quite disgusting isn’t it! The costume went down a storm and Monster got a lot of attention from bystanders that weren’t running away from us. I’ve never worn him facing out before so it was quite an odd sensation but he loved it and even joined in making zombie noises for part of it. It’s such a shame he was a bit too big for the outfit really as his feet stuck out the bottom of the t shirt which did spoil the look. He’s 14 months now so I suppose this would have been better with a 6 month old but Halloween happens in October not February and I can’t shrink him so we just went with the flow.
I absolutely loved this and I’m so glad I took part. I’m already counting down to next years and wondering what I can do for our next costume.
Photos enclosed are by me (obviously!), the wonderful Tom McGuire and Ken McDonald.


 Hello and here’s to my first tutorial on my new shiny blog! I’ve been using another popular platform for blogging but I didn’t find it too user friendly so thought I’d have a bit of a change, now all I’ve got to do is work out how to transfer everything from that one to this. Not today though!
So, to Mermaids… my life has been taken over by these fishy ladies recently. Niece #2 and Hurricane are mad about them and set me to making mermaid tails for their numerous dolls, this led to watching mermaid cartoons on YouTube and before I knew it Niece #2 was battering down the bathroom door whilst I was using the facilities as she was so desperate to show me Brooke and Bailey of CuteGirlsHairstyles swimming about in their Mermaid tails.
The challenge was set, could I make a Mermaid tail, nay, a Mermaid OUTFIT! With two very eager faces staring at me how could I say no? I’m halfway through the tails but my sewing machine has developed an issue or two (I think it’s fed up of purple lycra and has demanded a rest) so in order to have a break I made a start on some crowns/headdresses/headpieces/something pretty to wear in their hair. Here is how you can do it too.

You will need:
I had most of this in my craft stash luckily so my only outlays were:
That gives an extra cost of £6.08 which I didn’t think was too bad. I didn’t have to purchase the extra buttons or the large diamantés so could have made a saving there. The shells were a lucky find, I live right near to the beach so my original plan was to collect some and glue them on using my gun but these had a hole so could dangle which was something I thought I’d prefer, well, it’ll be easier!


So to start….

Cut a strip of hessian that’s approximately 2.5″ wide and 75″ long, if you can crochet or make chains by hand then chain this along it’s length. If not, divide this strip into 3 smaller strips 25″ long, knot them together with a strip of ribbon and plait it, securing it at both ends.

Your finished length of chains or plait should be approximately 18″ long. This won’t fit around your head, we’re going to use elastic eventually to close it and make it fit on your head.
Now get your ribbon, I’ve obviously chosen purple to match the beads and shizzle that I’ve already selected.
Attach it to one end of your chain/braid. You see those little loose threads in the picture below? Well I tucked the ribbon under the chain then tied it together using those threads.

Once it was secure, I wrapped it round and through and round and through before securing it at the other end in the same way. I wrapped another shade of purple ribbon through as well.


Now for the fun bit, all those lovely beads, buttons, shells and sparkly gubbins needed to be added on with the help of some wire. Don’t worry if you haven’t got wire, this would work if you used some strong sewing cotton. I’d recommend you use at least two length of threads held together for extra strength.

As you can see, what I’ve done here is push the wire through the hessian and then knotted it on itself to secure.
At this point you need to randomly add beads and buttons using the same method as the ribbon, wrap it around and push it through the hessian.


I got these fantastic buttons from my local yarn shop, I love the pattern of the wheel type ones.
 I know this is slightly teaching you how to suck eggs to attach the buttons you thread through one hole, push down to the chain/braid and then loop the wire through the second hole and pull tight.


At some point you’re going to want to add at least one flower. I purchased these flowers from a local shop called Chiltern Mills but you find them all over. I wanted a tropical flower but didn’t find the ones I wanted at a price I was willing to pay so I settled for these purple orchards.

As I said before, these orchards were super cheap but good quality so I settled on these rather than continue looking for something more tropical. You can get fake flowers everywhere from terribly expensive ones that look incredibly real to the almost transparent ones in poundshops and the like.
They’ve often got thin wire going through the centre of the plastic but a large pair of scissors should be sufficient to cut through. Separate the flowers from the stem and decide how many you want to use. To attach to the headdress you can wrap wire around them tightly but I found a pony bead fitted the short stems perfectly.
 See look, it’s a perfect fit!
 Now, I hope I can explain this clearly enough as I think it’s a bit difficult to see in the photographs. Thread the pony bead onto the wire then push the short stem through the bead. Make sure you hide the stem in one of the folds of hessian. Now wrap the wire around the stem above and below the bead. That should make it pretty secure.
 At this point I was joined by my eldest, Le Roux, who wanted part of the table for his modelling clay!
 It was also discovered that some of the pearly buttons made fantastic shields for lego figures.
 The shells, luckily for me already had holes in so I just threaded them on like beads.
Once you’ve threaded as many buttons, beads, diamantes, shells and flowers as you think it needs secure the wire to the end of the chain/braid and you’ve nearly finished!
Lastly, take the elastic (this is about 1/4″) and tie in the same way you attached the ribbon. Test it on a head, I’m using my daughter, Hurricane, here with the 4 braid plait that she asked for this morning looking quite messy now after a day at school and just see how big you need to make it. Knot it to the other side, trim the excess and you’ve done!

I would absolutely love to see ones that you’ve made so please comment to let me know how you get on. 

Last September Roux started school and came home talking about Skylanders. I don’t have a clue and as we have no games console roundly ignored it all.


Hallowe’en has been rapidly approaching (in my mind) as I had lots of crafting things that I’d been pinning with a view to trying and I’d been giving a lot of thought to costumes…
Roux and Hurricane were simple, he was desperate to go as a Werewolf and Hurricane swung between a Princess (roll eyes) and a Princess. She definitely wanted to be a Princess. In the end I managed to talk her into being a Vampire Bride which is at least slightly scary. I don’t know if it’s a British thing but when I look at Hallowe’en costumes from over the pond they seem to just be general fancy dress and anything goes but over here, in Britain we like our costumes to frighten so a Princess just would. Not. Do.
Those sorted I looked to mine and Elf’s, he’s recently been christened that moniker as he often resembles a very grumpy Elf when he’s not getting his own way. In other words if I’m not feeding him, gazing into his eyes, entertaining him or if I dare to commit the sin of actually putting him down I’m frowned at and quite often cried at. Anyway, due to his dislike of being out of my arms I needed to be able to incorporate him into my outfit and me into his. 99% of the time he’s either worn in a sling/Mai Tei/Close carrier/ring sling or in my arms so whatever I put him in wouldn’t really be seen. I started googling and scanning Pinterest but most of the (frankly amazing) outfits were for back carries, facing out or weren’t scary. We’ve already covered that it had to be a ‘scary’ outfit so dressing as a cute ladybird just wouldn’t do.
I came across this image from the ergobaby blog a few times but couldn’t find anything about it so I set about making my own. It’s not exactly scary but it’s a spider and they’re vaguely frightening aren’t they? I used to be terrified of them until I had mad moment and stuck a tarantula on my bonce and solved my fear in one foul swoop, sorry, I digress… Unfortunately for me, the internet went down for quite a bit of the night I started making it and I couldn’t get pinterest to load meaning that I had no image to reference to. If I had my time again I’d have done quite a few things differently and when I eventually managed to see the photo (after I’d finished) I realised where I’d made a few mistakes and there is lots I’d do differently but that’s what this blogs for – I’ve made the mistakes for you and I encourage you to make it again correctly.
Shopping list


